Mastering Realistic Portraits with Skin Procreate Brushes Swatches
Digital art has come a long way from the flat, plastic-looking portraits that used to plague beginner tablets. Today, the expectation for digital illustrations, especially character design and portraiture, is high. Viewers want to see texture, warmth, and life in every stroke. This is exactly where Skin Procreate Brushes Swatches change the game for artists working on an iPad. These aren't just standard round brushes with a new name; they are hand-created tools designed specifically to mimic the complexity of human skin tones and textures.
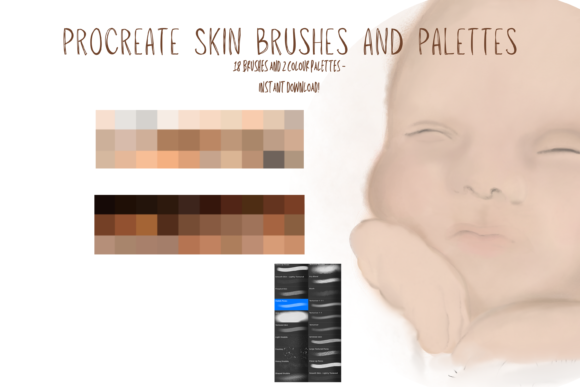
When you download this pack, you aren't just getting a single tool. You receive 18 unique individual digital brushes alongside two curated color palettes. The real power lies in their versatility. Unlike rigid tools that force a specific style, these brushes function dually as blending instruments and painting tools. Whether you are smoothing out a cheekbone or adding the rough texture of a sunburn, these brushes adapt to your pressure and flow. For those who have struggled to make their digital characters look "real" rather than like smooth mannequins, this resource offers a practical shortcut to professional results without needing years of technical study.
Why Texture Matters in Digital Portraiture
The difference between an amateur illustration and a professional piece often comes down to how light interacts with surface details. Human skin is never perfectly uniform. It has pores, fine lines, variations in pigmentation, and subtle shifts in temperature. When using standard software brushes, it is easy to over-blend, resulting in that airbrushed, unnatural look. Skin Procreate Brushes Swatches are engineered to prevent this. By incorporating texture directly into the brush stroke, they allow you to build up layers of color that retain a natural grain.
Consider the workflow of a freelance illustrator working on a book cover. They need the protagonist to feel tangible. Using these brushes, they can lay down base tones and then switch to a textured variant to add depth around the eyes and nose. The ability to resize these brushes using the brush resize tool in Procreate means you can work on macro details, like eyelashes or lip cracks, and then zoom out to paint broad shoulder areas without losing fidelity. Furthermore, adjusting the opacity slider allows for controlled buildup. You aren't forced into a heavy application; you can gently glaze colors over one another, mimicking the translucency of real skin.
Practical Applications Across Different Creative Fields
The utility of these brushes extends far beyond fine art painting. Different professionals and hobbyists find unique ways to integrate them into their daily workflows.
- Character Designers and Concept Artists: In the gaming and animation industries, speed and consistency are key. These brushes allow concept artists to rapidly prototype character looks. The included color palettes provide a solid starting point for diverse ethnicities, reducing the time spent mixing colors from scratch. Artists can quickly iterate on lighting scenarios, knowing the brush texture will hold up under different virtual light sources.
- Social Media Content Creators: Influencers and bloggers who create custom graphics or avatars often lack formal art training. Hand-created Procreate digital brushes simplify the process. Instead of struggling with complex layer masks, a creator can use these tools to enhance a selfie illustration or create stylized promotional art that feels personal and authentic rather than generic.
- Educators and Tutorial Creators: Art teachers using iPads in the classroom can use these swatches to demonstrate skin tone theory. Because the brushes handle blending so well, students can focus on color relationships and anatomy rather than fighting with the software. It democratizes the learning process, allowing beginners to achieve satisfying results early on, which boosts confidence.
- Small Business Owners: If you run an Etsy shop selling custom pet portraits or family illustrations, efficiency is profit. These brushes help maintain a consistent style across commissions. The ability to mix and match on various projects means you can adapt the same toolset for a whimsical children's book illustration one day and a realistic corporate headshot the next.
Advanced Techniques for Best Results
Owning the tools is only half the battle; knowing how to wield them unlocks their full potential. A highly effective technique mentioned by experienced users involves layering. Rather than trying to get everything perfect on the base layer, try adding textures at the end. Create a new layer above your painted skin and use a slightly darker color with one of the textured brushes. Then, apply a clipping mask. This confines the texture strictly to the skin area you've already painted, preventing messy edges.
Experimentation with blending modes is another crucial step. Don't be afraid to switch a layer from "Normal" to "Multiply," "Overlay," or "Soft Light." This interacts with the Skin Procreate Brushes Swatches in unexpected ways, often creating rich, subsurface scattering effects that look incredibly lifelike. Additionally, remember that the strength of the blend ink charge can be altered. If a stroke feels too heavy, dial back the opacity. If you need more coverage, increase the flow. The brushes are responsive, meaning they react to the speed of your Apple Pencil stroke, giving you organic variation every time you draw.
Technical Requirements and Setup
Before diving in, it is important to understand the ecosystem these files live in. These are digital brushes that will only work within the Procreate App. You cannot use them in Photoshop, Clip Studio Paint, or on Android tablets. To utilize them effectively, you need an Apple Pencil and the Procreate App installed on an iPad Pro or compatible iPad model. Without this specific hardware and software combination, the files will not function.
The installation process is straightforward but requires a few specific steps. First, you will need a platform to download the files to, such as iCloud Drive or Dropbox. Once downloaded, the file will likely be zipped. You will need a program to unzip the files, such as iZip or the native Files app on newer iOS versions. After extracting the folder, tapping on the brush file will automatically import it into Procreate. It is a seamless process, but ensuring you have the right utilities installed beforehand saves frustration.
Making the Right Choice for Your Workflow
When considering whether to add Skin Procreate Brushes Swatches to your library, think about your current bottlenecks. Do you spend too much time trying to manually texture skin? Do your portraits lack warmth? If the answer is yes, this pack addresses those pain points directly. However, if you prefer a highly stylized, cel-shaded anime look with zero texture, these might be more than you need.
It is also worth noting that while tools help, they don't replace fundamental observation. These brushes simulate reality, but you still need to observe how light hits a face. Use the included color palettes as a reference, but don't be afraid to deviate. Real skin reflects the environment; a person standing near a red wall will have red tones reflected in their shadows. These brushes make applying those environmental colors easier because they blend naturally rather than smearing muddy pixels.
Ultimately, digital art is about expression and efficiency. Whether you are a hobbyist looking to improve your weekend sketches or a professional marketer needing high-quality visuals for a campaign, having the right tools streamlines your creative process. These hand-created brushes offer a bridge between technical limitation and artistic vision, allowing you to focus less on the "how" and more on the "what" of your storytelling. By integrating them into your routine and experimenting with layers and blending modes, you can elevate the quality of your digital humanity, one stroke at a time.